
Welcome to Brome Bird Care Support
-
Product Support
-
-
-
- How do I get parts for my feeder?
- What is your “best” feeder?
- What type of seed should I use in my Squirrel Buster® Plus?
- Which feeders can be pole-mounted?
- Why are my feeding ports not fully open?
- Why are nuisance birds still able to eat?
- Why aren't Cardinals coming to my feeder?
- Why is my seed wet?
- Will the feeder withstand high winds when it is mounted on a pole adaptor?
-
- Adjust the Perch Length on the Plus (video)
- Adjust the Tension on the Plus (video)
- Buy the Plus
- Cleaning Your Feeder (video)
- Download the Plus Brochure
- Fix Loose Perches on the Plus (video)
- How to Assemble the Hub (video)
- How to Assemble the Spring Mechanism (video)
- How to Install the Cardinal Ring (video)
- How to Replace the Spring (video)
- Installing the Cover on the Plus (video)
- Installing the Pole Adapter on the Plus (video)
- Installing the Weather Guard on the Plus (video)
- Plus Assembly (video)
- Plus Disassembly (video)
- Plus Parts Diagram
- Removing the Cover on the Plus (video)
- Show all articles ( 2 ) Collapse Articles
-
-
-
-
-
- Can I replace the perches?
- Do no-mess seed blends work in your feeders?
- How do I clean the Squirrel Buster® Standard and Mini feeders?
- How do I get parts for my feeder?
- How much seed does the Squirrel Buster® Standard hold?
- What is your most popular feeder?
- Why is my feeder always in the open position?
- Why isn't the seed accessible?
-
-
-
-
- Adding Additional Weight to the Classic (video)
- Can I shorten the wire?
- How do I get parts for my feeder?
- Is this feeder adjustable?
- Why does my seed tube move from right to left?
- Why is my cover assembly cable frayed?
- Why is my feeder always in the closed position?
- Why is my feeder not closing?
- Why is my feeder not going up and down?
-
-
-
-
- Can I attach the Seed Buster to a feeder?
- Can I use the Seed Buster on a shephard's crook?
- Can the Seed Buster be used for water?
- Do the Seed Buster collars fit other sizes of poles?
- Does the Seed Buster come with a pole?
- How do I get parts for my feeder?
- Is the tray squirrel proof
- What kind of birds does the seed tray attract?
-
-
- Articles coming soon
-
- Are the Erva poles rust proof?
- Can the height of the poles be modified?
- How high are each section of the pole?
- Is the arm part detachable on the Erva 5 piece pole set or is it integrated into one of the pole pieces?
- Should I grease my pole to deter Squirrels an other critters?
- What are the Erva poles made of?
-
-
-
- Articles coming soon
-
-
Bird Food
-
- Can I use finch mix/blends in the Finch feeder?
- Do no-mess seed blends work in your feeders?
- How do I feed mourning doves?
- How do the feeders pay for themselves in saved seed?
- Is there a squirrel buster feeder for Meal worms?
- What are the best Squirrel Buster feeders for Sunflower hearts?
- What type of seed attracts cardinals?
- What type of seed attracts Grosbeaks?
- What type of seed attracts nuthatches?
-
-
Cleaning your feeder
-
Placing your Feeder
-
- Can squirrels knock my feeders down?
- Did You Find Your Feeder on The Ground In The Morning?
- How can I secure my feeders so raccoons and other critters can’t throw them down at night?
- How far apart should my feeders be placed?
- I don’t have a tree in my yard. What is my best hanging option?
- Managing Chipmunks
- What is the best location in my yard to place my feeder?
- What is the best way to hang a feeder from a branch?
- Which feeders can be pole-mounted?
- Why do I need 18” of clearance?
-
-
Bird References
-
Fun Bird Feeding Activities
-
Birdscape your Yard
-
- Can I limit the number of birds at my feeder?
- Can I limit the type of birds at my feeder?
- Do I need shrubs and trees in my yard to attract birds?
- Do I really need weather protectors?
- How can I prevent sparrows?
- How do I choose the right feeder?
- How do I use a pole system on a concrete patio with no grass available?
- How long will it take before I start seeing birds at my feeders?
- Managing Chipmunks
- Should feeders be oriented North/South/East or West?
- Should I put my set up at the front of the house or the back?
- Should my feeders be in the sun or in the shade?
- What are the best feeders for small birds?
- What are the feeders that best suit the seasons?
- What can I do to protect my feeders from deer?
- What is the best feature to add after I set up my feeder?
- What is the best location in my yard to place my feeder?
- What is the best protection against raccoons?
- What is your “best” feeder?
- What is your most popular feeder?
- Show all articles ( 5 ) Collapse Articles
-
-
All Help Topics
-
Ecards
How to Assemble the Hub (video)
Assembling the Hub on your Squirrel Buster®Plus
video tutorial
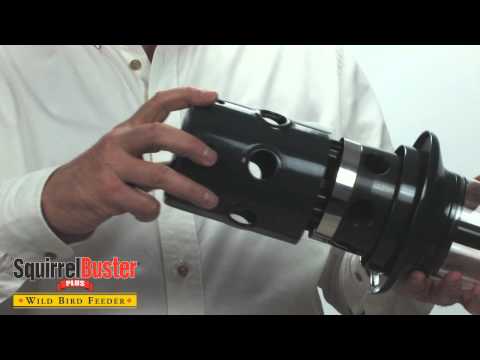
If you prefer to read the instructions, please follow below.
Here are the steps to assemble the hub.
1.Remove the shroud if necessary.
2.Remove the upper hub assembly by pulling firmly.
3.Remove the cardinal ring by screwing the perches inward.
4.Unscrew the 6 perches.
5.Remove the lower hub assembly.
6.Locate the yellow markings on both parts of the hub assembly.
7.Align the yellow markings and snap the two halves of the hub assembly together.
8.Locate the yellow marking on the bottom of the base.
9.Locate the yellow marking on the hub assembly center post.
10.Align the 2 yellow markings and insert the hub assembly into the base. If it does not slide in easily, check the alignment.
11.Put the shroud over the hub assembly and rotate it until it sits on the nub.
12.Loosely screw on the wing nut
13.Insert the 6 perches.
14.Check that the shroud opens and closes easily.
15.Install the cardinal ring.
16.Tighten the wing nut using thumb pressure.
2.8 out Of 5 Stars
11 ratings
| 5 Stars | 18% | |
| 4 Stars | 18% | |
| 3 Stars | 18% | |
| 2 Stars | 0% | |
| 1 Stars | 45% |